Jewelry has always been more than just an accessory. It’s a way to express your personality, capture memories, and carry symbols that mean something deeply personal. Among all types of jewelry, charm bracelets hold a special place because they are like wearable stories—each charm represents a milestone, a passion, or a cherished memory. Instead of buying a ready-made piece, learning how to make your own charm bracelet allows you to create something that is truly one of a kind.
Whether you are a beginner at jewelry making or simply looking for a fun and meaningful DIY project, crafting your own charm bracelet is both rewarding and creative. This guide will walk you through the process step by step, from choosing the right materials to designing a bracelet that reflects your unique style.
Why Make Your Own Charm Bracelet?
When you decide to make your own charm bracelet, you’re not just creating jewelry—you’re building a story you can wear. Unlike pre-made pieces, a DIY charm bracelet gives you complete freedom to choose the type of chain, the metal finish, and the charms themselves. You can mix modern styles with vintage designs, add meaningful pendants, or even repurpose old trinkets into new life.
It’s also a cost-effective way to have a luxury-looking accessory without spending a fortune. Buying individual charms and assembling them yourself often comes out cheaper than purchasing designer charm bracelets. And on top of that, it becomes a therapeutic, hands-on hobby that many jewelry lovers enjoy.
Most importantly, every bracelet you create carries a piece of your identity. Imagine gifting a handmade charm bracelet to a loved one where each charm represents something meaningful in their life—such a gift feels priceless.
Choosing the Right Base for Your Charm Bracelet
Every beautiful bracelet begins with a strong base. When you make your own charm bracelet, you’ll want to select a chain or band that is durable and comfortable to wear. The most popular options include sterling silver, gold-plated chains, or stainless steel bases. Silver is versatile and affordable, while gold adds a timeless elegance.
Think about the type of closure as well. Lobster clasps and toggle clasps are secure choices, especially if you plan to add many charms. If you’re going for a more casual, boho-inspired look, leather cords or fabric bands are also great bases to experiment with.
The key is to pick something that balances style with functionality. Remember, the chain must be strong enough to hold the weight of multiple charms without breaking or stretching.
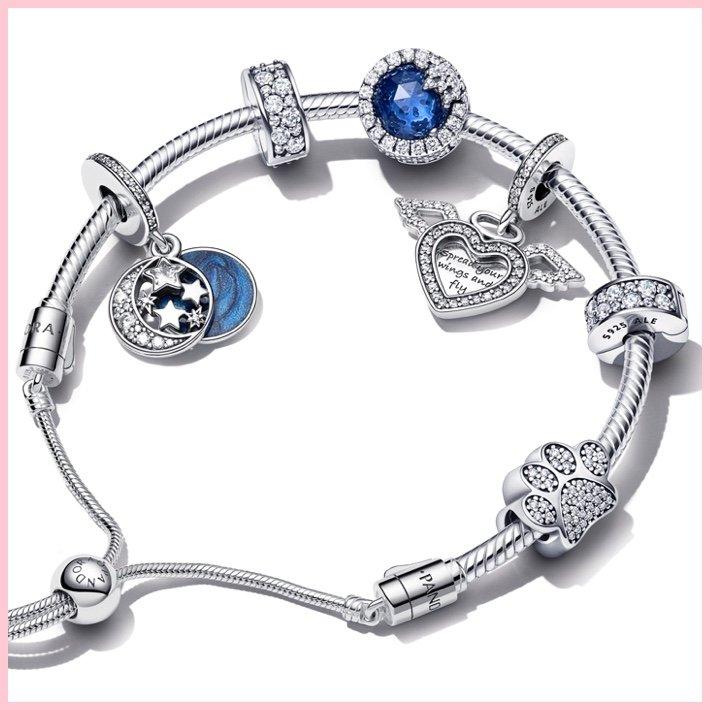
Selecting the Perfect Charms
This is the part where creativity truly shines. The charms you pick will define the personality of your bracelet. When you make your own charm bracelet, you can choose from countless options—lockets, initials, gemstones, travel symbols, zodiac signs, animals, or even small handmade beads.
One tip is to mix and match charms that reflect different parts of your life. For example, a heart charm might symbolize love, a tiny airplane could represent travel, and a birthstone adds a personal touch. If you’re making the bracelet as a gift, think about the recipient’s hobbies, dreams, and milestones.
Another option is to choose a theme for your bracelet. Some people love celestial themes with stars and moons, while others prefer nature-inspired charms like flowers, shells, and leaves. The beauty of making your own is that there are no strict rules—only personal meaning.
Designing Your Charm Bracelet
Before you start attaching charms, it’s helpful to lay them out on a flat surface. This allows you to visualize how the final piece will look. Spacing is important—placing all the charms too close together can make the bracelet look cluttered, while spreading them evenly gives it balance.
A trick many jewelry makers use is to create a “focal point” by placing one larger charm in the center and surrounding it with smaller ones. This creates a natural flow and makes the bracelet more visually appealing.
You can also play with colors. Mixing gold and silver tones gives a modern edge, while sticking to one metal creates a sleek, classic look. If you’re using gemstones or enamel charms, try to coordinate the colors so they complement each other.
Designing is the most exciting part because it’s where your imagination comes alive. It’s also perfectly fine to rearrange charms over time. That’s the magic of a charm bracelet—it evolves with you.
Tools and Techniques You’ll Need
To make your own charm bracelet, you don’t need a professional jewelry studio. A few simple tools are enough to get started. Small jewelry pliers, jump rings, and a sturdy work surface are essential. The pliers will help you open and close jump rings securely so your charms don’t fall off.
Attach each charm one by one, making sure the jump rings are tightly closed. It may feel a bit fiddly at first, but once you get the hang of it, the process becomes enjoyable. If you’re working with delicate charms or beads, patience is key—taking your time ensures that the bracelet will last for years.
Adding a Personal Touch
The real beauty of making your own charm bracelet lies in customization. You can engrave charms with initials, add photos inside lockets, or include charms picked up from your travels. Some people even make seasonal bracelets, swapping out charms for holidays, birthdays, or special events.
Another creative idea is mixing handmade charms with store-bought ones. Polymer clay, resin, or wire-wrapped beads can add an artisanal feel to your bracelet. Not only does this make the bracelet unique, but it also allows you to experiment with different craft techniques.
Every time you add a personal element, the bracelet becomes more meaningful. It’s not just jewelry anymore—it’s a reflection of your journey.
Caring for Your Charm Bracelet
Once you’ve taken the time to make your own charm bracelet, you’ll want it to last. Proper care ensures that it stays beautiful for years. Store it in a jewelry box to prevent scratches, and avoid exposing it to harsh chemicals like perfumes or cleaning agents.
For silver bracelets, polishing cloths can help maintain shine. If your bracelet includes leather, make sure to keep it away from water to prevent damage. Regular maintenance not only keeps it looking new but also preserves the sentimental value behind each charm.
The Joy of Wearing and Sharing
There’s something magical about slipping on a charm bracelet you designed yourself. Each time it jingles on your wrist, it reminds you of the memories and meanings attached to it. And when someone asks about your bracelet, you’ll have a story to tell—one that only you could create.
Making your own charm bracelet also opens the door to sharing. You can craft bracelets for friends, siblings, or even as bridesmaid gifts. Each one can be tailored to the person receiving it, making it an unforgettable present.
Final Thoughts
Learning how to make your own charm bracelet is more than a jewelry project—it’s an act of creativity, storytelling, and personal expression. From choosing a sturdy base to handpicking meaningful charms, every step allows you to design something that truly belongs to you. Whether you’re making it for yourself or as a heartfelt gift, the process is as rewarding as the final piece.
So, gather your tools, pick out charms that spark joy, and start creating a bracelet that carries your story. Once you try it, you’ll see why charm bracelets have been treasured for generations—they are timeless, personal, and always in style.